

How to Layer Necklaces for Beginners: A 2026 Guide
Table of Contents
- The Golden Rules of Layering Necklaces
- Choosing the Right Chain Lengths for Layering
- How to Prevent Necklaces From Tangling
- Necklace Layering Combinations for Every Neckline
- Minimalist Gold Necklaces for Women: Building a Core Collection
- Mixing Metals and Balancing Chain Weights
- Maintenance and Storage for Layered Necklaces
- Frequently Asked Questions
Last Updated: September 28, 2026
The Golden Rules of Layering Necklaces
Learning how to layer necklaces for beginners comes down to three rules: vary your lengths, vary your textures, and always work from a base piece. Get those right and layering stops being intimidating.
Here's the short version:
- Different lengths: Each chain should sit at least 2 inches apart
- Different weights: Pair one thin chain with one heavier piece
- One anchor: Start with your longest chain and build upward
- Odd numbers: Three or five chains look more balanced than two
Choosing the Right Chain Lengths for Layering
The right chain lengths for layering are 16, 18, and 20 inches, spaced 2 inches apart so each piece has room to sit on its own.
Length is the foundation of any layered look.
How to Prevent Necklaces From Tangling
The best way to prevent necklaces from tangling is to control the back of your neck, not the front. Space chains at least 2 inches apart, fasten every clasp, and route three or more chains through a single multi-strand clasp so they share one connection point instead of three loose ones.
Why chains tangle in the first place
Three forces do most of the damage:
- Clasp drift. Each chain has its own clasp, and those clasps slide around your neck independently. When two clasps cross, the chains above them twist together.
- Weight mismatch. A heavy chain pulls a lighter one toward it. Pair a 3mm rope with a 0.8mm cable and the cable will migrate into the rope's path within an hour.
- Link friction. Diamond-cut, rope, and box chains have edges that grip. Two smooth cable chains slide past each other; two textured chains lock.
The hardware that fixes it
A necklace detangler (also sold as a multi-strand clasp or layering clasp) is a single connector with two to five loops or hooks. Every chain fastens to the detangler, and the detangler fastens to your neck with one closure. The chains can no longer cross at the back because they never separate.
Common types:
- Magnetic multi-clasp: Easiest to put on one-handed. Strong magnets hold well, but some people with pacemakers or implanted medical devices should avoid magnetic closures.
- Lobster multi-clasp: The most secure option. Takes two hands and a mirror, but it will not pop open during the day.
- Layered look chains: A single chain with pre-set attachment points at fixed intervals. You lose adjustability but gain a guaranteed spacing.
Daily habits that stop knots before they start
- Fasten every clasp before you take the stack off, never after
- Lay chains flat in a line instead of dropping them in a pile
- Keep textured chains (rope, box, diamond-cut) away from each other in the same stack
- Check your clasps: a tight lobster clasp holds better than a worn spring ring, and a spring ring that has lost tension is the single most common cause of a chain slipping free and wrapping around its neighbor
- Take the stack off before you sleep, shower, or work out
If you already have a knot
Do not pull. Pulling tightens a knot and can stretch or snap a thin cable chain. Lay the chain flat on a light-colored surface, add a drop of oil, and tease the loop open with two pins. If the knot is in a rope chain, work from the loosest loop first, rope chains tighten against themselves and the outer loop is always the easiest entry point.
Necklace Layering Combinations for Every Neckline
The best layering combination depends on your neckline: scoop and V-necks suit a matinee-length chain, while crew and turtleneck styles work better with a shorter princess stack.
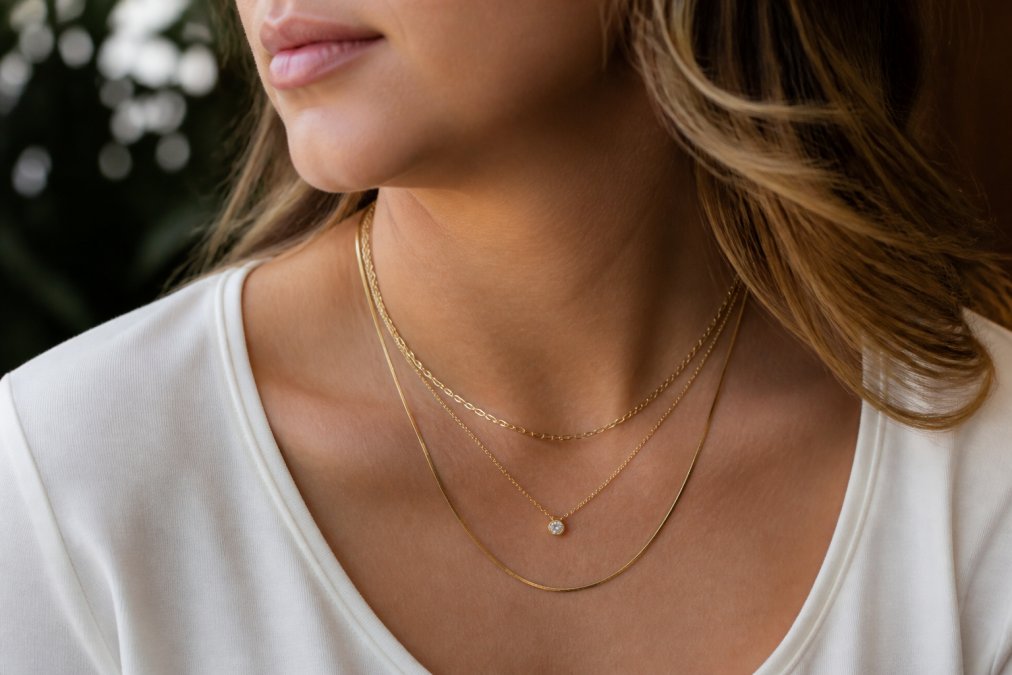
- V-neck: Mirror the V with a pendant on an 18-inch chain
- Scoop neck: A 20-inch matinee chain fills the open space
- Crew neck: Keep it short, a 16 and 18 inch pair sits above the fabric
- Turtleneck: Go long with a 24-inch opera chain over the knit
- Button-down: Leave one button open and let a princess chain sit in the gap
Minimalist Gold Necklaces for Women: Building a Core Collection
A core collection of minimalist gold necklaces for women needs just three pieces: a thin chain, a box chain, and one chain with a small pendant.
Sterling Silver Yellow Gold Plated →
Here's a starter set that layers well together:
| Piece | Role in the Stack | Why It Works |
|---|---|---|
| Thin cable chain | Base layer | Sits closest to the neck |
| Box chain | Middle layer | Adds a clean, sleek line |
| Pendant chain | Top layer | Draws the eye and finishes the look |
Mixing Metals and Balancing Chain Weights
Mixing metals works when you repeat each tone at least twice across your stack. One gold chain among three silver ones looks accidental. Two of each looks intentional.
- Light: dainty cable and box chains
- Medium: rope and diamond-cut chains
- Heavy: chunky links and statement pendants
Maintenance and Storage for Layered Necklaces
Layered necklaces last longer when you store them flat, keep them dry, and wipe them after each wear. Gold plating and sterling silver both react to moisture, sweat, and chemicals, and a stack that is stored wrong will tangle, tarnish, or scratch itself overnight.
The order of operations
Get this sequence right and you eliminate most damage before it starts:
- Apply lotion, perfume, and hairspray first
- Let everything dry completely
- Put your jewelry on last
- Take it off first when you get home
- Wipe each chain with a soft cloth before it goes back in the tray
Storage systems that actually work
- Lined jewelry tray with individual slots: The gold standard. Each chain gets its own channel, so nothing touches. Look for felt or velvet lining, untreated wood and cardboard can release acids that tarnish silver.
- Anti-tarnish pouches: Small zip pouches lined with a tarnish-inhibiting material. Good for travel and for sterling silver pieces you wear less often.
- Acrylic necklace organizer with hooks: Keeps chains vertical and separated. Best for longer opera-length pieces that would kink in a tray.
- Travel case with a built-in roll: Prevents chains from shifting in a bag. A soft roll beats a hard box for layered sets because the chains stay flat.
What not to do: hanging a layered stack from a single hook. The chains will cross, and the weight of the heaviest piece will stretch the lightest one over time.
Material-specific care
- Sterling silver: Tarnishes when exposed to sulfur compounds in the air. Store in an anti-tarnish pouch or a sealed bag with a tarnish strip. A silver polishing cloth restores shine; avoid dipping solutions on chains with glued stones or plated accents.
- Gold plated: The plating wears with friction and moisture. Never use an ultrasonic cleaner or abrasive polish on plated pieces, both strip the layer. A soft dry cloth is the only safe routine.
- Solid gold: The most forgiving. Warm water, mild dish soap, and a soft brush handle most buildup. Dry completely before storing.
- Mixed-metal stacks: Store gold and silver separately. Contact between the two can cause a galvanic reaction that discolors silver over time.
A weekly and monthly routine
- Weekly: Wipe each chain with a dry soft cloth. Check clasps for tension and look for kinks near the clasp where stress concentrates.
- Monthly: Deep clean solid gold and sterling silver pieces with mild soap and warm water. Inspect plated pieces for dull spots that signal wear.
- Seasonally: Rotate pieces you have not worn. Store them in anti-tarnish pouches rather than leaving them exposed on a tray.
For questions about what terms like "gold plated," "gold filled," and "sterling" legally mean in product descriptions, the Federal Trade Commission publishes guidance on jewelry marketing claims. For plain-language background on gold and silver quality, the Gemological Institute of America maintains public educational resources.

Frequently Asked Questions
What is the trick for layering necklaces without tangling?
The most effective trick is to space your chains at least two inches apart in length, so each one rests on a different part of your chest. Use a necklace detangler or a multi-strand clasp to hold chains together at the back. Choosing different chain styles, like a box chain next to a cable chain, also reduces friction. Fasten clasps at the back and check that pendants hang freely without overlapping.
How many necklaces should you layer for a minimalist look?
For a minimalist look, stick to two or three necklaces. Start with a short base chain, add a mid-length piece with a small pendant, and finish with a longer chain if you want more visual interest. Minimalist gold necklaces for women work especially well because their clean lines keep the look elegant rather than busy. Fewer pieces with distinct lengths create more impact than a crowded stack.
Can you mix metals when layering necklaces?
Yes, mixing metals is a popular styling choice. Pair warm tones like yellow or rose gold with cool tones like white gold or sterling silver. To keep the look intentional, repeat each metal at least twice across your layered pieces or use a mixed-metal pendant as a bridge. A 14K rose gold box chain layered with a white gold rope chain creates a balanced, modern contrast.
How do you choose the right necklace lengths for layering?
Start with a shorter length as your base, then add a mid-length and optionally a longer chain. Each chain should sit at least two inches below the one above it. This spacing prevents overlap and keeps each piece visible. Adjust based on your neckline and the pendants you want to highlight.
Layering necklaces takes a little practice, and the first stack rarely looks perfect. The good news is that a few well-chosen chains solve most of the problem. Savannah Lane Jewelry offers fine gold and sterling silver chains built for daily wear, with free shipping on every order and 10% off your first purchase when you sign up for email. Start with one anchor chain, add a second, and build from there. Shop now and find the pieces that fit your everyday style.